Environment setup Linux
This tutorial guides you through the setup of a local installation of Cloudrexx for Linux. For a development setup follow this guide and then check out the Next steps at the end.
Install GIT
Install GIT using the package management of your distribution. For Debian based systems you may execute the following command:
Install Docker
The automated setup of Cloudrexx relies heavily on Docker and Docker Compose. Docker version 1.14 and Docker Compose version 1.9 are minimal requirements. The following instructions will install a much newer version of both on your system:
Install Docker CE and Docker Compose. Here's a summarizing command for lazy people on Ubuntu (on your own risk):
Download, install and setup
Navigate to your working directory
Open the terminal of your choice and use the cd command to get to a new (/empty) folder. Optionally create a new folder using mkdir.
Warning
Make sure you shut down any service that is running on port 80 on your system before you proceed. Alternatively, use a different port for your environment.
Execute the following command and follow the instructions:
Info
The command you just started pulls the necessary files from BitBucket and DockerHub, configures Docker Compose, starts the Docker containers, loads the database and configures your Cloudrexx installation. The process is automated but the script might ask you a thing or two.
Open your local installation in your browser
After the command completed, you should be able to open your local Cloudrexx installation in your browser using the following link: http://clx.dev. To access the database you may use http://clx.dev:8234.
Tip
These links work because clx.dev, including all possible sub-domains and even sub-sub-domains of it, point to 127.0.0.1 (localhost).
Now feel free to enjoy your own Cloudrexx installation. For more information on what the script did or what else it can do, please refer to the next two sections.
More information
The script you executed has started multiple docker containers for your installation:
- db: A container running MariaDB
- usercache: A container running Memcached
- phpmyadmin: A container running phpMyAdmin
- web: A container running Apache
- mail: A container running MailHog to receive mails
- php: A container running PHP-FPM
- cron: A container running Cron
The "web" container is directly bound to your machine's port 80 (by default). This way you can access the webserver directly using any URL pointing to your host.
Next steps
Virtual-host setup
If you will have multiple local installations you may want to execute the following command in order to allow a virtual-host setup:
This shuts your environment down (in order to free the occupied port 80) and starts the reverse proxy that will handle the virtual hosts. Then your environment is automatically reconfigured as a virtual-host (since the proxy is running) and started again. Please note that the URL for phpMyAdmin will have changed after this (since direct access via port is no longer necessary/possible).
This will create the following setup for you:
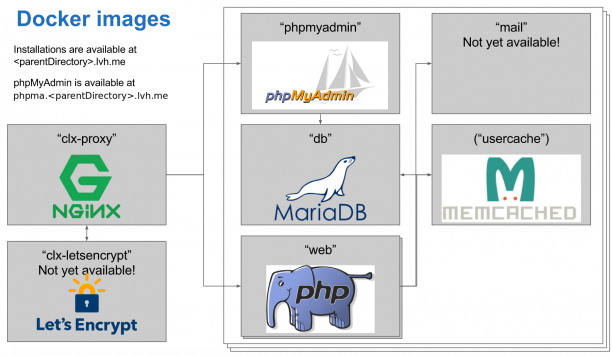
Now the "clx-proxy" container is directly bound to your machine's port 80 (by default). You can directly access the "web" and "phpmyadmin" containers through the proxy.
Further reading
For more information about how the above works and what else the script can do, please refer to CLI script.
Explore the available commands
Type the following command to get a list of all available commands:
You can get a more detailed description of a specific command by adding the command as an argument to the help command. For example to get a detailed description of the "env" command type:
Some commands have sub-commands. If so, they also provide a description of the sub-command using the same principle. For example to get a detailed description of the "update" sub-command of the "env" command type:
Usage examples
Use a different port, change other settings
If you want to change the used port or any other setting, you can use the following command to reconfigure your system:
Or you can call config directly with the desired values as arguments. For the available arguments refer to the output of:
The same arguments can also be passed to ./cx env init to directly initialize your system with the desired configuration.
Something went wrong during "./cx env init"
If something went wrong during the initialisation of your environment you have the following options:
- Delete all files and re-try: Simply delete all files in the folder (including hidden ones like the ".git" folder)
- Retry init without GIT clone: This saves a lot of time if GIT clone was successful. This can be done by using the following command:
./cx env init --skip-source --skip-scripts
Contrexx
Since Contrexx is not part of the public GIT repository on BitBucket you will have to specify another repository or download it manually:
If you have a repository already containing a Contrexx, you may use the following command:
Otherwise you may download and extract the source code by hand and then call the following command:
Install from an official package using the web installer
In order to install from an official package or to test the web installer, you may follow these steps instead of the ones in the package's readme.
Info
For official packages, these steps are necessary since the web installer creates some files which are otherwise missing.
- Download the package and extract the contents of the
CMS_FILESfolder to your working directory. - Download or copy the
cxscript to your working directory (unless the package is version 5 or newer). - Call
cx env init --skip-source --skip-database. - Use the following command to see the database configuration:
cx env config --show - Your environment should be up and accessing it using your browser should redirect you to the web installer. Follow the installer's instructions and when asked to, use the database configuration from the previous step.
- After the web installer is finished you should call
cx env init --skip-source --skip-scripts --skip-database
Install from existing project source
The following guide assumes that there's an existing project in the current directory:
- Make sure you have a backup of the project.
- If the project is a copy of a live site, you may need to cleanup some directives in the
.htaccessfile. Some hostings require special directives to activate PHP. Additionally, some sites may use custom redirect rules. These directives and rewrite rules need to be removed. - Create the directory
installer/data:mkdir -p installer/data. If it already exists, delete and re-create it. - Copy a complete database dump of your project into the file
installer/data/contrexx_dump_structure.sql. - Create the empty file
installer/data/contrexx_dump_data.sql:touch installer/data/contrexx_dump_data.sql - Install the cx-script by downloading it from https://bitbucket.org/cloudrexx/cloudrexx-oss/raw/main/cx and making it executable:
wget https://bitbucket.org/cloudrexx/cloudrexx-oss/raw/main/cx || curl -O https://bitbucket.org/cloudrexx/cloudrexx-oss/raw/main/cx && chmod +x cx - Start the environment by executing
cx env init --skip-source.
Failure
If the installation is not working as expected you might be using the wrong version of PHP. Execute cx env config --show to see which PHP version is used. To change the version use cx env config --php-version=7.4 for PHP 7.4. After this you need to restart the environment using cx env restart.
Info
If you cannot solve a problem Cloudrexx offers support. Please file your request here.