Component Definition
This article describes the structure and function of a Cloudrexx component (\Cx\Core\Core\Model\Entity\SystemComponent). For a tutorial on how to create your own component, do see Create Cloudrexx App.
Components are self-contained parts of Cloudrexx. A component can be added or removed, without affecting other components. Components can have dependencies to other components (for Example: a lot of different components need the Html component to be present).
So when creating a component, all your code must be located within one single directory. If you change any line of code outside of your component's directory, you're probably doing something wrong...
System Component
Every component is represented by an entity of \Cx\Core\Core\Model\Entity\SystemComponent in the System Component Repository (\Cx\Core\Core\Model\Repository\SystemComponentRepository) that is managed by the Component Handler (\Cx\Core\Core\Controller\ComponentHandler).
The ComponentController (which must extend \Cx\Core\Core\Model\Entity\SystemComponentController) of every component provides the following magic methods:
$this->getName()- Returns the name of the component$this->getDirectory()- Returns the file system path where the component is located$this->getType()- Returns the type of the component$this->cx- Shortcut to the instance of \Cx\Core\Core\Controller\Cx that did instantiate the component$this->getSetting($settingName, $user)- Fetch (user-based, if$useris set totrue) Setting$settingNameof the component$this->getRepo($entityName)- Fetch the Entity Repository of a Doctrine ORM Model Entity identified by$entityName
Component types
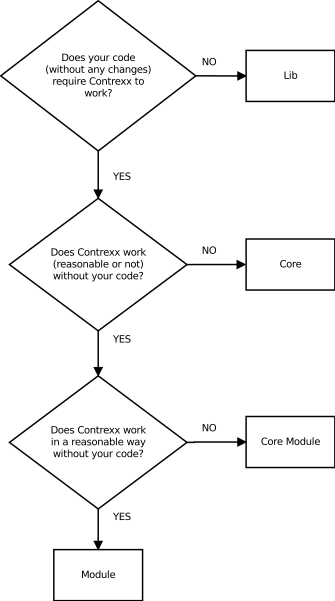
Here's a simple graphic showing whether your code will be part of lib, core, core_modules or modules:
If you are creating/adding a library, simply create the directory /lib/{name_of_your_lib} and start developing your lib. You may skip the following steps!
Lib
Integrate third-party libraries according to Third-party libraries.
Directory structure
New components use the following directory structure:
| Directory | Usage | Deployment |
|---|---|---|
Component.yml |
Meta definitions of the component | x |
Controller |
Controller classes | x |
Data |
Data for the component | x |
Data.sql |
Contains base data for this component | - |
OldStructureWithTestData.sql |
Contains old structure with some data for testing Note For legacy components (without doctrine models), do put the SQL DDL statements in here. | - |
Migration.sql |
Migrates OldStructureWithTestData.sql Note For legacy components (without doctrine models), this file must be present (can be empty though) to have the command cx env component update <componentType> <componentName> --db work. |
- |
* |
All other files and folders within this folder | x |
Dev |
Development scripts | - |
Doc |
ERD, PDFs, etc. | - |
*.yml |
YAML files | x |
Model |
Model classes and definitions | x |
Entity |
Model entity classes | x |
Event |
Event listener classes | x |
Repository |
Model repository classes | x |
Yaml |
Model YAML definitions | x |
Testing |
Testing scripts and classes | - |
UnitTest |
UnitTests | - |
View |
View files | x |
Media |
Images, PDFs, etc. | x |
Script |
JavaScript | x |
Style |
CSS | x |
Templates |
Template files | x |
Frontend |
Template files for frontend mode | x |
Backend |
Template files for backend mode | x |
Command |
Template files for command mode | x |
Generic |
Template files used in more than one mode | x |
lang |
Language files | x |
en |
English language files | x |
frontend.php |
English frontend mode language file | x |
backend.php |
English backend mode language file | x |
... |
Other languages | x |
README.md |
Component description. (Filename is case insensitive). | - |
- All of these directories are optional,
README.mdis mandatory. - The structure can be extended according to your needs, but do not add any directories to any level specified here. If you add a directory, write its name in singular CamelCase (see Naming conventions).
- All directories with sub-directories should not directly contain files (you may break this rule in directories you create yourself, but you shouldn't).
- All files are named in CamelCase (except
README.md) and do not contain the Component's name (again see Naming conventions).
What data to store where
Where to store data depends on whether the data is per website, per component (multiple websites may use the same codebase) or per user and whether it should be publicly available or not:
| Data per | Public | Temporary | File system location | Example |
|---|---|---|---|---|
| Component | Yes | No | <componentFolder>/View/Media/* |
Manual for this component as a PDF |
| Component | No | No | <componentFolder>/Data/* |
Static component specific SSL certificate |
| Website | Yes | No | /media/public/<componentName>/* |
Downloads without access restrictions |
| Website | No | No | /media/private/<componentName>/* |
Downloads with access restrictions |
| Website | Yes | Yes | /tmp/public/cache/<componentName>/* |
Cached images and thumbnails from remote system |
| Website | No | Yes | /tmp/cache/<componentName>/* |
Cached non-public imports from CSV |
| Session | Yes | Yes | /tmp/public/<folderId>/* 1 |
Export |
| Session | No | Yes | /tmp/session_<sessionId>/<componentName>/* |
Uploader |
MVC
Strictly follow the MVC pattern by putting
- the model logic (including any business logic) into the /Model directory of a component
- the output/GUI elements into the /View directory of a component
- and the controller logic into the /Controller directory of a component.
This also means that neither the /Model, nor the /Controller elements must contain any HTML code. Instead do use the Html component to generate HTML output.
Model
The model of a component consist of
- the actual models (under
/Model/Entity) with its definition (under/Model/Yaml) and associated repositories (under/Model/Repository) - and optional Event Listeners (under
/Model/Event).
Cloudrexx supports the following two types of repositories to manage the entities of models. For each of your models, do choose the one most appropriate. If unsure, do use \Doctrine\ORM\EntityRepository.
| Storage Engine | Repository | Description |
|---|---|---|
| Database (default) | \Doctrine\ORM\EntityRepository |
Use to store entities in the database by using the Doctrine ORM. Refer to Entity Integration, Entity Repository Integration and Mapping Driver on how to implement a model (under /Model/Entity), its definition (under /Model/Yaml) and its repository (under /Model/Repository). |
| File System | \Cx\Core\Model\Controller\YamlRepository |
Use to store entities (as \Cx\Core\Model\Model\Entity\YamlEntity) in the file system. This is mainly useful for entities that shall be accessible in cases when no database is present (e.g. when delivering a cached response). |
View
The view is generated using the Template System. As stated in section Controller, backend templates are located in {your_component_directory}/View/Template/Backend. Frontend templates are loaded based on the resolved page. If the page content contains the placeholder [[APPLICATION_DATA]] then this placeholder is replaced by the associated application template. The application templates are located in {your_component_directory}/View/Template/Frontend. By default the application template Default.html of the resolved component is loaded. If the current page has the property cmd set for which an application template exists, then this template will be used instead. Application templates can be overwritten by placing a file using the same name in {template_directory}/{your_component_type}/{your_component_name}/Template/Frontend.
JavaScript and CSS
If you create a component using the Workbench's create command it automatically creates a JavaScript- and CSS-file for both, the front- and backend views (Frontend.js / Backend.js / Frontend.css / Backend.css). Those files are automatically loaded in the related mode (fontend / backend) as long as they exist. Drop them if you don't need them.
Controller
If you create a component using the Workbench's create command it adds two controllers to your Component: A FrontendController and a BackendController. They do most of the work that is needed for almost every component. Both of them contain a parsePage() method (that gets called by the load-hook) with a bit of code to start with.
Backend sub navigation
The BackendController also has a method named getCommands(). You may return a one- or two-dimensional array of strings. There is an empty entry that will be rendered as Default. This will automatically generate a sub navigation. For example:
This would generate a navigation matching the one of the e-mail marketing module. For every level, a default is added, so the first entry can be omitted. If you only need one navigation point, you may return an empty array (default). The backend controller then searches for language variables of the following scheme: TXT_{COMPONENT_TYPE}_{COMPONENT_NAME}_ACT_{1ST_LEVEL}(_{2ND_LEVEL}). For the added default, DEFAULT is used for 1st and 2nd level.
It is possible to restrict access to selected sections by assigning a Permission instance to them. Unauthorised sections will not be listed in the generated navigation. I.e.:
Content
The method parsePage() gets called by passing along the following two arguments:
| Argument | Type | In Frontend System Mode |
In Backend System Mode |
|---|---|---|---|
$template |
\Cx\Core\Html\Sigma |
The Template System instance has the content of the resolved page loaded (and the placeholder [[APPLICATION_DATA]] replaced by the associated application template). |
The template file (from {your_component_directory}/View/Template) associated to the set value of $cmd is loaded if it matches an entry from getCommands(). Otherwise the template Default.html is loaded. |
$cmd |
String |
Set to the page's area property. | Set to the requested command. |
Write own ComponentController
By default, the \Cx\Core\Core\Model\Entity\SystemComponentController class is used as main controller for your Component. It registers the controllers FrontendController and BackendController for you. If any of the following conditions are true, you need to write your own ComponentController:
- You want to add another Controller
- You don't need the Frontend- or BackendController
- You want to respond to any of the Component Hooks
- You want to expose a method
- Add documentation URLs for your component
- Use command mode
- You want to register an event
- You want to listen to an event
In order to write your own ComponentController you can simply create a class named ComponentController which extends \Cx\Core\Core\Model\Entity\SystemComponentController in the file <yourComponentDirectory>/Controller/ComponentController.class.php.
The following sections explain how to proceed for the use cases listed above:
Add another controller
- Create the file
<yourComponentDirectory>/Controller/<yourControllerName>Controller.class.php - Define the class
<yourComponentNamespace>\Controller\<yourControllerName>Controllerwithin the file. Let it extend\Cx\Core\Core\Model\Entity\Controller - Register the controller in your
ComponentControlleras shown by the following example:
Don't need Front- or BackendController
Adjust the list in the method getControllerClasses() accordingly (see use case "Add another controller" above).
Respond to Component hooks
Implement the matching method (of the component hook) in your ComponentController according to its DocBlock.
Expose methods
Select a Controller (or create a new one) to register for exposing methods. Then follow Expose a controller's method.
Add documentation URLs
Set one or more of the following properties in your ComponentController:
Use command mode
Overwrite the methods getCommandsForCommandMode(), getCommandDescription() and executeCommand() according to their specification. See Register your own command
Register an event
Implement method registerEvents() according the documentation.
Listen to an event
Implement method registerEventListeners() according the documentation.
-
See \Cx\Core\Core\Controller\ComponentController::getPublicUserTempFolder() ↩