App Tutorial
This tutorial will guide you through the creation of a Cloudrexx app in five steps.
Info
This tutorial assumes that you have a working setup of Cloudrexx to play with. If you don't, please refer to Environment Setup.
Name and type
Before any code is written or generated you should think about what your app (further on this will be called it by its technical name "component") should do. Choose a meaningful name based on your considerations which consists of at least two nouns written in camel-case. As an example we will use "TodoManager" here.
As for the type: A component can be of type core, core_module or module:
- core components are required by Cloudrexx to work properly.
- core_module components are not technically required by the system, but they are required to make the system do something useful.
- module components are everything else. Most apps are of this type.
Create app
After you've chosen your component's name and type you may continue by creating it. In order to save you the work of creating all files manually and register the component in the system by hand Cloudrexx provides a component called "Workbench" which provides some commands to simplify things.
The workbench can be invoked by calling ./cx workbench (or ./cx wb). This command will show you a list of available sub-commands. In this step we will use the "create" sub-command:
This will create your component's folder and copy some sample code into it. In addition, it registers your component in the system, adds an entry to the backend navigation and makes sure your component is active and accessable.
Info
If you want to re-distribute Cloudrexx including your component (which is possible under the AGPL), your component has to be licensed under AGPL.
If you use your component for you and your customers only (without re-distribution), you can license your component under any license you wish. You should indicate the license in the file headers and in a license file within your component's directory.
To provide a nice example for this tutorial we will create a simple component of type module named "TodoManager". Create this component by running the following command:
Tip
You should track your code using a VCS. We propose to track the contents of your component directory. For GIT you could do so by issuing the following command from within that directory:
A repository with the example component explained in this article can be found on Bitbucket.
MySQL Workbench
Info
If your component does not need a database model, you may proceed with Model interaction.
Cloudrexx uses Doctrine to interact with the database. In order to map the database objects with PHP objects Doctrine uses a schema specification which is saved in YAML (*.yml) files.
Since the process of creating the necessary files is quite repetitive, the Workbench component includes a command which can help you create them. For this you need to design your database model in MySQL Workbench first. Place the .mwb file in your component's "Doc" directory.
When designing your model with the MySQL Workbench, you should keep the following rules in mind:
- Name your tables according to the following scheme:
[component_type]_[component_name]_[entity]- Tables names are written in lower case
[component_type]is one of core,core_module, module.[component_name]is your component's name in one word. Example: todomanager[entity]is the name of your entity which can contain underlines.- Do not include the database prefix (DBPREFIX) in the table name. Cloudrexx does this for you.
- When renaming fields which are part of a relation, MySQL Workbench does not reflect these changes in the relation. Therefore you should consider re-drawing the relations after such an action.
- Do not include tables from outside of your component. If you have a relation to a framework table (for example to the "user" table), do not add this relation in this step.
- Always use the database type
TIMESTAMPfor points in time. Cloudrexx automatically handles timezones for this type. - Cloudrexx includes several Doctrine behaviors. Use them where applicable instead of reinventing the wheel in your model:
- Translatable: You can mark individual columns as "translatable" which allows the translation of them.
- Tree: Creates tree-like structures using the nested-set technique.
- Loggable: You can mark individual columns as "loggable" which allows to track their change history.
Info
Doctrine behaviors are applied in the step Add missing relations and behaviors.
Here's a MySQL Workbench file for our example component:
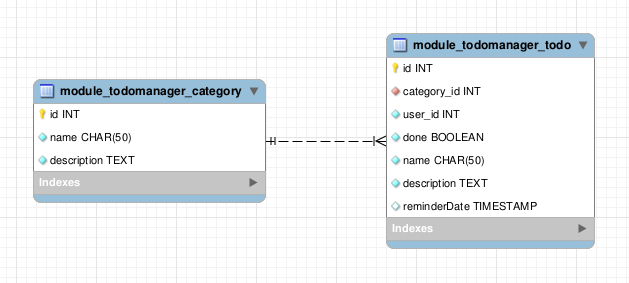
Download the MySQL Workbench file here and place it in the folder modules/TodoManager/Doc/.
Generate model
In order to generate the model you've designed in the previous step, use the following command ([component_name] needs to be written in camel-case here):
The command performs the following steps:
YAML generation
The command will show a list of all .mwb files in your component's "Doc" folder prefixed by a number. Choose the correct number for the file you want to use or just press enter to skip this step. In our example we want to use the only file there is so we type "1" and press enter.
The workbench now tries to generate the .yml files for you (under Model/Yaml/ of your component). If you run this more than once, you will be asked if the already existing files should be overwritten. If you did not change anything manually you can answer with yes ("y").
Entity generation
Based on the .yml files Doctrine is now instructed by the workbench to generate the necessary entity classes (under Model/Entity/ of your component). If you run this more than once, you will be asked if the already existing files should be overwritten. If you did not change anything manually you can answer with yes ("y").
If there is a bug in your schema, this step is the most likely to fail. You may want to check the generated .yml files to see where the problem is coming from, in order to fix it in the MySQL Workbench file.
Info
If you cannot solve a problem Cloudrexx offers support. Please file your request here.
Repository generation
Once the entities are generated, Doctrine is instructed to generate a repository class for each entity (under Model/Repository/ of your component). You may or may not need them. If you don't need them you can remove them from your component. In this case you should delete the "repositoryClass" property from the respective .yml file.
Database statements
Now Doctrine shows the database DDL statements necessary to adjust the database to the new schema and you are asked whether those should be executed in the database. Please review the statements carefully before saying yes to this question. If there are statements do not want to execute, you can copy and paste the others end execute them manually.
Validation
As a last step Doctrine is instructed to check if your schema is valid and in sync with the database. If there are any errors here do fix them!
Info
If you cannot solve a problem Cloudrexx offers support. Please file your request here.
TodoManager
In order to generate the model for our example component you should execute the following command:
Add missing relations and behaviors
Relations
Now is the time to add the missing relations to entities which are not part of your component. In our example, there is a relation from the field module_todomanager_todo.user_id to the framework entity User.
If you create your own app you should refer to the Doctrine documentation in order to understand Doctrine mappings.
The generated YAML files contain slightly too much data: Foreign key fields are mapped twice. In our example component the only such case is the category_id field of the Todo entity. Therefore we should drop the following code from the file modules/TodoManager/Model/Yaml/Cx.Modules.TodoManager.Model.Entity.Todo.dcm.yml
For the example component, we will add the missing relation to the User entity. For this we drop the old mapping for the user_id field and add a new one. In the file modules/TodoManager/Model/Yaml/Cx.Modules.TodoManager.Model.Entity.Todo.dcm.yml drop the following code:
And add the following code to the end of the file:
You should then re-run the workbench db update command without re-generating the .yml files to apply these changes:
Behaviors
As a next step, we add the necessary mappings for the desired behaviors. In our example component, we want the Todo's name and description to be translatable. For this we need to extend the file modules/TodoManager/Model/Yaml/Cx.Modules.TodoManager.Model.Entity.Todo.dcm.yml so it looks as follows:
Furthermore our Todo entity needs to implement the Translatable interface. Change the class header of the Todo entity (modules/TodoManager/Model/Entity/Todo.class.php) so it looks as follows:
The class also needs a locale property and a method called setTranslatableLocale($locale). Add the following code to achieve this:
and
You should then re-run the workbench db update command without re-generating the .yml files and without overwriting the existing entities to apply these changes:
Tip
Do not forget to commit your changes to your VCS.
Business logic
Entity and repository classes are the perfect spot to put your business logic.
In our example we will always set a Todo's user to the current user if none is specified and let the Category identify itself by its name. First add the following constructor to the Todo entity:
This sets the user to the current user by default for all new Todo's. To make categories show their name we add the following method to the Category entity:
Model interaction
This chapter will cover the possibilities to interact with the model.
Info
If your component does not need a database model, you may want to add other types of entities manually. Independent of your component having a database model or any model at all, this chapter might be interesting to see how your component can interact with the world.
ViewGenerator
If you navigate to the backend of your installed Cloudrexx, you should now be able to find your component in the "Applications" section. If you follow this link you can see that the system automatically created an overview and a settings section. Additionally, there's a section for each entity you created. These sections allow us to add, edit and delete entries for these entities. The piece of code that generates these views is refered to as "ViewGenerator". You can customize these views by using the ViewGenerator's options.
In our example we will hide some columns and show the category name instead of it's ID. Additionally we will add the ability to search through the Todo's. For this we replace the method getViewGeneratorOptions() in the file modules/TodoManager/Controller/BackendController.class.php by the following code:
BackendController
By overriding methods of the BackendController's parent class you can easily change the behavior of our backend views. In our example app we do not need the overview section. To achieve this we can simply change the return value of the showOverviewPage() method.
More information on what can be done this way, please refer to the SystemComponentController's DocBlocks.
Events
Events are a nice tool to simplify interaction between components. If you want your component to provide events you can do so in your ComponentController's registerEvents() method. In order to listen to events you can use your ComponentController's registerEventListeners() method.
For more information please refer to Event Management.
For our example component we will implement a named "TodoManager/Done" that gets triggered whenever a Todo is marked as done. In order to tell the system that we provide such an event we need to change the method registerEvents() in modules/TodoManager/Controller/ComponentController.class.php as follows:
Since we want to trigger our event if a change to a Todo happens, we need to listen to model changes of Todo's. Therefore we need an EventListener. Add the following code to the file modules/TodoManager/Model/Event/TodoEventListener.class.php:
Model change events are provided by Doctrine and routed through the Cloudrexx event system. We want to listen to postUpdate events in order to trigger our event after the change is made persistent. We don't trigger the event for Todo's that are created in done state. Since we cannot check which fields changed in postUpdate we need to also register to preUpdate to get the previous state of the Todo. In order to do so we need to change the method registerEventListeners() in modules/TodoManager/Controller/ComponentController.class.php as follows:
In our EventListener we listen to those events and check if the done property has changed to "true":
And that's it. We now have an event named "TodoManager/Done" which is triggered whenever an existing Todo is marked as done.
API
Cloudrexx automatically provides RESTful API access to all Doctrine entities. In order for this to work, you need to register your entities on the RESTful API and set access permissions on them.
In our example component we will provide full read-only access to both entities using an API key. To do so you need to execute the following statements on your environments database:
This adds an API key dev, a DataSource for each of our entities, a DataAccess object for these DataSources and maps our API key to both of these DataAccesses. After those statements are executed you should be able to get a list of your Todo's by opening /api/v1/json/todomanager-todo/?apikey=dev in your browser.
Testing
In order to simplify maintainability you should use UnitTests. There's an example UnitTest in your component's "Testing" folder. You can run the following command to execute the tests:
User experience
Language files
In order to translate frontend and backend views, Cloudrexx uses language files. Each component has its own set of language files located in the component's "lang" directory. English language files are a requirement for all language variables of all components as English is used a fallback if a language variable is otherwise not present.
For each language there is a file for frontend and backend. The components name and description should be set in both of these.
For our example component we overwrite the exising language variables in modules/TodoManager/lang/en/backend.php with the following content:
You can test if this worked by opening or refreshing the backend view. It should now contain these pretty-looking language strings. You may add the same variables in any other backend language.
Widgets
Widgets are placeholders with system-wide availability. You can find more info about Widgets here.
For the example component we will create a widget which shows the current user's Todo's. For this we need to register the widget, add code to parse it and drop its cache whenever a change happens. To register the widget add the following code to the postInit() method of modules/TodoManager/Controller/ComponentController.class.php:
To parse the widget, create a new file modules/TodoManager/Controller/EsiWidgetController.class.php with the following content:
Since we us a language variable here, we need to add it to modules/TodoManager/lang/en/frontend.php:
In order for the system to know about this new EsiWidgetController we need to register it. For this, change the code of getControllerClasses() and getControllersAccessableByJson() methods in modules/TodoManager/Controller/ComponentController.class.php to:
Now the widget should be working. Test this by placing [[TODO_LIST]] somewhere on your website (in a webdesign template file, in a content page or pane, ...). This should show a small table with all of the user's Todo's or a message that he has none. You may want to use a different template for ViewGenerator than the default backend table.
Frontend
In order to display content on the components application pages we need to create templates in modules/TodoManager/View/Template/Frontend/ and parse them in modules/TodoManager/Controller/FrontendController.class.php.
The example component will show a filterable list of all Todo's on its main page. On a detail page a single Todo is shown. To make this work we will first create two templates Default.html and Detail.html with the following contents:
Next, add the following method to modules/TodoManager/Controller/ComponentController.class.php as we will need it in different places:
Then, adjust the code of modules/TodoManager/Controller/FrontendController.class.php as follows:
This allows you use the default page as an overview over all Todo's and to create a second page with section "Detail " which parses a single Todo.
Settings
Mail templates
By default the BackendController adds a section (under /cadmin/[component_name]/Settings/Mail) to manage e-mail templates that can be used by your component for sending e-mail notifications. The component responsible for managing e-mail templates is called MailTemplate on which you can find more information here.
For the example component we'd like to automatically send out an e-mail whenever a Todo is marked as done. So we can trigger the mail by listening to our own event we created earlier. Add the following code to the file modules/TodoManager/Model/Event/TodoMailEventListener.class.php:
In order to trigger this event code we need to register this new event listener as we did before. Add the following code to the method registerEventListeners() in modules/TodoManager/Controller/ComponentController.class.php:
Other settings
You can easily add settings by using the Setting component as these settings are displayed in your component automatically. Just make sure that "section " equals your component's name and "group " is "config ". You can then access such settings by using the following code:
For our example component we will add a setting to hide done Todo's. Execute the following CLI command to initially add the setting:
In order to really hide done Todo's if this setting is active we need to add the following code to modules/TodoManager/Model/Repository/TodoRepository.class.php:
We need to tell the system how our settings is named for end-users. To do so we add the following entry to modules/TodoManager/lang/en/backend.php:
Cleanup, Export and review
Cleanup
Before exporting you should have a look at your component and remove any unused code (new Components contain lots of non-necessary example methods).
Additionally, you should add any missing DocBlocks to ensure maintainablility of your component.
Export
If you want to use your component on a site hosted in the Cloudrexx cloud or simply need a way to move a component to another installation you need to export your component. You can do this using the following command:
Info
You can specify an absolute or relative file name for the ZIP package. Please note that when using a dockerized setup you may want to specify a relative path within the Cloudrexx working directory otherwise the ZIP package might end up within the container.
To generate a package for the sample component you can use the following command. You can download the TodoManager component ZIP package here.
Review
Before using your component on a production environment you should review it. If you want to use your component on a site hosted in the Cloudrexx cloud this needs to be done by us. Cloudrexx also offer reviews for components not hosted on our systems.
In order to let us do the review of your component, please fill out the review request form.
Further reading
Here are some links you might find interesting for your Cloudrexx app projects: